fences-5

Building a beautiful picket fence

A picket fence not only prevents people and animals from entering your yard, it also gives your property an attractive and finished look. Hardware and home improvement stores sell fence panels that simplify the task of building your own wooden fence. Try planting roses or a vine to soften the look of the fence.

Instructions

  1. Dig the first hole for the pole with a hand shovel if you need less than a dozen holes and are excavating relatively soft soil, for harder or more holes than a dozen, consider renting an excavator. Start by digging a whole 10 ” (25.4 cm) in diameter with straight sides using a shovel.
  2. Place a pole at the first hole and add back in 8 ” (20.3 cm) of soil. Ensure that the post is vertical and tamp the soil and press it in place. Add 8 ” (20.3 cm) of soil and repeat the process of leveling and tamping until the hole is full.
  3. Tie a 5” string (12.7 cm) from the ground to the side of the post. Bring the rope to the first corner of the fence and drives a stake there. Wrap the rope around the stake to mark the first side of the fence.
  4. Dig a second hole for the pole at the point marked. Place the second post in the same way as the first.
  5. Use wood shims to prop the fence panel 2”-5 ” (5-12 cm) above the ground, and use 2 screws of 1/2 ” (1.2 cm) to attach the panel to the studs. Continue to place poles and fix the panels until you’ve completed your fence.
bedroom-remodeling-5

Arranging your living room to work for you

The living room is a common gathering place for family and friends. The room has to accommodate several pieces and can be used for various purposes, such as watching television, entertaining guests and play. Factors such as traffic and the size of the room can also play an important role in determining both practical and aesthetically appealing furniture. Take time to plan what your room will primarily be used for before moving furniture in order to reduce the amount of heavy lifting required to place the furniture in your room.

Instructions

  1. Measure the length and width of the room. Record these numbers and make a scale drawing of the room, marking the locations of the windows and entrances. Record the length and width of the space in your sketch.
  2. Measure the length and width of the sofa, chairs, tables and other furniture such as shelves, to be placed in the room.
  3. Evaluate the architecture of the room. Determine the focal point of space, this can be a great window with a view, a fireplace or built cabinet that houses the TV. If there are no significant focal points, in your drawing label the longest wall with a window or an entry.
  4. Arrange the pieces, placing the sofa and chairs to watch the focal point of the room, and position to also form a “U”. If there is no focal point, position the sofa on the longest wall and place the chairs on either side, to create the “U.”
  5. Place a coffee table in front of the sofa and tables on either side of it. This is the conversation area and the anchor for the room.
  6. Allow a gap of two feet between the wall and the couch. Determine if this disrupts any possible traffic that is directed through the room from the entrance. If so, push the couch back as it was. If not, leave it where it is.
  7. Work outward from your conversation area. If the television is the main attraction in the room, position the sofa opposite it. Angle the chairs on either side, to also look at the television. This allows you to rotate if you have company, or in case you gather for a family conversation.
  8. Create small areas in the room. Using your clippings of your pieces for your sketch determine where the remaining furniture would make sense. Some of these may include a game table and chairs, a shelf and a reading chair, or other personalized spaces. Begin with the space between the conversation area and the focal point, and place these areas near the walls. Note traffic patterns; do not place furniture in front of entrances or hallways that are blocking the conversation area.
  9. Use your drawing to scale with the cuts and physically accommodate your furnishings following the plan. Add your accessories like personal pictures, vases and beads. Live with the placement for a few days and make necessary adjustments to your personal needs.


Tips & Warnings

  • Light up your conversation area with table lamps in each zone.
bedroom-remodeling-2

How to design a master bedroom with a bed facing a window

Some master bedrooms have windows in front of the only place where it logically makes sense to put a bed. In most cases, this is not problematic, and natural light is welcomed to the room. However, certain things you need to consider when designing a bedroom where your windows are behind the bed to make sure the room makes visual sense and works properly.

Instructions

  1. Use drapery from floor to ceiling behind your bed to give the room a feeling and a stylish look. The floor to ceiling drapery can also make the room seem larger. For a more contemporary look, do not use drapery with folds and select pleated heavier drapery for a more traditional feel.
  2. Hang curtains or use blinds for a more rustic look. In your bedroom the curtains and blinds work best in a large room that does not need help visually to expand. For a more contemporary look, use Roman shades or vertical blinds made of modern materials such as metal.
  3. Avoid putting tables that are too light next to the bed. They make the windows difficult to open and close.
  4. Keep objects such as lamps and vases with fresh or silk flowers out of the way of the windows. There are both functional and aesthetic reasons for this. You can easily pull and break the items when opening and closing the curtains, and if the items are too high, they will be out of place in front of the window treatments.
  5. Center the bed under the window as much as you can. If the bed is the first thing you see upon entering the room, an off-centered bed will make the decor look crooked and uncentered. Even if your windows are a little off-center, having your bed face the windows will look better.

Tips & Warnings

  • If your windows are a bit off-center and you are using curtains, extend the curtain rods on each side of the window to give the illusion of a window centered properly. That way you can focus your bed against the wall.
drywall-2

How to decorate the walls of the master bedroom

When decorating a master bedroom one of the first decisions you must make is the color of the walls. The color, the design and texture you choose will generate an important aspect in the overall impact of the room and you can use these elements to create a style specific in space. There are several options for decorating the walls of a master bedroom, so you must take into account factors such as the budget, the style you want and the labor required before deciding your final choice.

Painting

Painting, as it is available in a variety of colors and finishes, is an economical option to renew the look of your walls effortlessly. The paint color you choose for the bedroom should be relaxing, with colors like blue, green, lilac, peach or beige. For a small room choose a light shade to make the space look larger. However, if the bedroom is large you can choose more saturated shades. You can also use texturing techniques like painting faux finishes with sponges or rags, so they look as if they were made of stone, marble, leather or other materials. If you prefer a pattern, use templates to apply decorative designs or a border on the top or bottom of the walls.

Papering

Often wallpaper is used to cover the walls of a bedroom, but the application is more laborious than applying paint and cannot easily be changed. However, wallpaper is available in a wide range of colors and designs, so you can completely change the look of a room. Some of these papers are textured and can generate an interesting aspect to the bedroom. If you do not want to paper all of the walls of the room, you can cover only the wall behind the bed with a print paper so it will become the focal point of the room. You can also use a wallpaper border on top or bottom of the wall to create a more subtle effect design.

Cast

If you like the look of textured walls, plaster finish is an attractive option for your bedroom. In general, you can stain or glaze before applying plaster, so you can customize it with a color that matches the decor of the room. Often the plaster on the walls is applied with a semicircular motion, but you can apply with a trowel making the design you prefer. The application process is more intense than that of traditional painting, but is ideal for covering walls that are damaged as you can hide many surface defects.

Wooden panels

For a rustic room with wood panels are ideal. The wood-paneled headboards are an attractive option, but you can get flat or embossed sheets of wood panels. Before installing you can paint or stain them to customize the look of the material. As with the wallpaper, you can apply one or two panels on walls to create visual interest or create a main wall. You can also use only panels at the bottom of the wall as molding.

fences-5

How to decorate a chain link fence

The silver wire fence is very useful for marking the boundaries of many residences, government buildings and businesses. Typically strong and functional, the wire mesh is not intended to be a decorative material. To ensure your privacy, you can place vines with abundant foliage and fragrant flowers in it. If you choose to cover your fence with an evergreen plant, like English ivy, you can also add some seasonal details to add a touch of visual interest. Moreover, the coated wire mesh is also a practical, simple and good looking option.

Instructions

Climbing plants

  1. Select a few climbing plants that suit the location in the sun or shade of your chain link fence. Some climbing species with flowers like roses, wisteria and sweet peas prefer sunny places. Vines like English ivy, honeysuckle and Virginia creeper tolerate dense shade.
  2. Prepare several holes separated by about 6 inches (15 centimeters). Make sure that the holes are at least two times deeper and wider than the root of the individual plants that are going to be planted or transplanted. Mix a shovelful of compost material in the excavated soil. This mixture is known as “base fill”. Loosen the soil at the bottom and sides of the hole and water until evenly wet.
  3. Place the plants in the holes, spreading the roots gently. Cover the root knot completely with the mixture of soil and compost material and water well. Help guide the branches of the vine to the fence with a rope made of natural fibers as they grow.
  4. As the seasons are changing, add some decorative outdoor details. Choose a large wreath illuminated by a series of lights during major winter days and a mass of flowers, as they can be hyacinths, daffodils and artificial tulips for spring. Consider adding a colorful collection of beach toys for the summer. Secures objects to mesh with a piece of natural rope.

Plastic strips to close

  1. Measure the width and length of the area you’d like covered and multiply these numbers to get the total area of the billboard. This is essential when buying plastic strips. This material blocks almost all the view from the outside as it is specially designed for this purpose. You will need approximately 250 feet (76 m) of plastic strips weaved diagonally across each link in the mesh, and thus completely covering an area of about 40 square feet (3.72 m).
  2. Give it a custom look by using strips of color of your university or corporate logo. This material can be achieved by special ordering the color and design you want. –Verde Standard colors, black and White– are available in stores and online major home improvement stores. Try to choose strips of colors and designs that complement the style of your property. Even just using two colors, you can create some pretty creative designs.
  3. Diagonally measure the distance from the top of the fence to the base, using the measuring tape and extending directly along the links line. Remember that you must weave a single strip of plastic on each of the links of each diagonal fence row. Once the length of the line is determined, cut a strip of this size and weave through the links. Pay attention to the way you work and try to leave the fabric loose enough to carry comfortably before continuing the weave. Alternating strips of plastic canvas fragments create business privacy screens. They can serve to represent foliage. Choose warm neutral colors simulate a natural environment.

Tips & Warnings

  • For holidays and special occasions, decorate your mesh fence with white or colored flashing lights.
  • Keep your plants carefully trimmed. The overgrowth can lead to insects and other animals.
Concrete

DIY Concrete finish with gravel

Gravel concrete finish can be performed without problems as a “do it yourself” project by the owner of any house. The mixture consists of gravel and Portland cement and special finish is performed similarly to ordinary concrete. It is possible to finish the project in a couple days. Everything depends on the size and scope of your plans.

Instructions

  1. When preparing the cement mixture, there are two ways to add gravel to your concrete mix. You can order it at a concrete supplier and request that the large gravel is replaced with gravel. You can also add the gravel to concrete and mix everything yourself. If you’re preparing yourself, add half the bag of Portland cement, sand, and 3 gallons (about 11 liters) of water. Mix with a hoe or a cement or concrete mix truck. After the mixture is ready, add 3 to 5 gallons (about 12 to 20 kg) of fine gravel.
  2. Pour into the chosen area for your project and rake until it reaches the top of your wooden mold area. Use a shovel and a rake to evenly distribute the concrete mixture. After leveling the mixture up to the wooden forms, use a trowel to work the concrete until smooth. Rub the concrete trowel in a circular motion until you have a “mud” like layer on the concrete surface.
  3. Work the surface with a float or concrete trowel. This tool can be rented at any home improvement store, hardware store or warehouse building. It consists of an aluminum plate about 4 feet (1.22 meters) wide that is attached to a long handle. The float or trowel generate a completely smooth surface that should cure for at least 20 minutes or until no more water appears on the concrete.
  4. Spray the surface with a hose and a spray nozzle. Use just enough to wash the top layer of “mud” concrete pressure. Try it in an area no more than 12 x 12 inches (30 x 30 cm). If you notice that the cement is clear or leaving deep cracks, pass the trowel or hand trowel along it and then try after 10 minutes. Use a bristle brush to remove medium-hard concrete and to brighten the gravel surface, but do not rub. The purpose of this step is to remove only the thin layer of concrete that covers the surface of the gravel.
  5. Apply a concrete sealer to the surface after 72 hours using a garden sprayer type pump

Tips & Warnings

If the store has no concrete with gravel, purchase the cement and add gravel yourself.

duct-cleaning

Cleaning air conditioning ducts easily

During the summer many people us their air conditioning. The ducts can become clogged with pet dander, dust from the house and several other remains. The key to saving money and keeping your air conditioner in good condition is to periodically clean the ducts. Cleaning the ducts should only take about 10 minutes and will keep your home healthier and allow for better air circulation.

Instructions

  1. Remove the covers of the ventilation duct. If the covers have screws, with a screwdriver remove them. For types that just fit, lift a corner at a time.
  2. Wash the ventilation covers with soapy water. Apply two or three drops of mild dish detergent in a sink filled with warm water. If dust and dirt remain, let the covers soak. Rinse with clean water and dry them with a clean cloth.
  3. Clean the inside of the ducts as deep as you can with a damp cloth.
  4. Using a vacuum wand will allow you to remove both dust and debris within the duct. Although more thorough cleaning can only be achieved by a professional cleaning service, you should be able to clean a few feet in. If the accumulated dirt remains there, loosen it with a cleaning brush. Vacuum the rest of the dust and debris in and around the area.
  5. Affix the ventilation covers.

Tips & Warnings

  • Save the screws of covers in a plastic bag while cleaning the decks to avoid losing them.
  • Use gloves and a face mask. There could be harmful mold present inside the air conditioning ducts.
concrete sidewalk

What is polymer concrete?

Polymer concrete is not traditional concrete, although they have some materials in common. It is used for construction projects like traditional, but the polymer components give several features that make it more secure and durable than ordinary concrete. The polymer tends to be more expensive and more denser than traditional concrete.

Definition

Polymer concrete is a mixture of aggregate that uses some type of epoxy to cure and harden in place. Usually a mixture of standard epoxy, polyester or vinyl is used, but polymer concrete can be made with many polymer resins which allow the concrete to be poured or vibrated before it hardens. It is cured through a chemical reaction with the polymeric material. Like traditional concrete, it also has water, sand and gravel as main ingredients.

Benefits

Polymer concrete offers various benefits depending on the resin used to make it. Acrylic joints harden quickly and provide weather resistance, while epoxies create a very strong material that shrinks as it heals. Furan resins can withstand high temperatures, and can replace the resins polyuria’s phenols and formaldehyde in many construction projects.

Considerations

The polymer concrete should be mixed accurately and very well. You cannot mix it in advance and keep moving it to avoid curing (chemical reaction happens anyway). In addition, the chemical is in this type of concrete can be very dangerous and anyone who is close to it should wear masks and protect their skin.

Applications

Polymer concrete is used for many types of special construction projects. Like other types of concrete it can be used to join various components or to give a base or structure. The material is used in industrial or electric concrete constructions where long lasting and resistance to different types of corrosion is required.

Polymer mortar

Polymer mortar is a mild type of polymer concrete made only of a bonding material and fine aggregate such as sand. It is used primarily to attach objects like normal mortar, but it does not have the same tendency to wear in harsh climates. It can also be used to cover objects for protection.

roofing-6

The advantages of a hipped roof

Hipped roofs have surfaces that descend to the four sides of a house. Typically, the design incorporates a peak on top of the roof, where all four sides, two rectangular and two triangular meet. Hipped roofs have certain advantages over other types of roofs, although they are usually more expensive.

Fortress

A hipped roof has greater strength and durability than gabled roofs due to the method of their construction, according to the book “Framing Roofs” and “Fine Homebuilding”. Unlike other types of roofs, the structure provides resistant pitched roofs with the ability to better withstand natural disasters, such as earthquakes. Hipped roofs also work well against strong winds due to its aerodynamic design, which can prevent the loss of shingles during windstorms.

Eaves

Another positive aspect of the hipped roofs arises from the symmetry of the design. Unlike gabled, hipped roofs do not have vertical edges, they have eaves around the perimeter of the house. Eaves play an important role in protecting the home against inclement weather, prevent rain from hitting the sides and protecting the home from ultraviolet solar radiation. The presence of the eaves allows owners to put gutters around the perimeter of the house.

Appearance

Some owners choose a hipped design for aesthetic reasons and prefer the smooth, compact appearance of a hipped roof over other styles. The hipped roof works particularly well in houses built close to the ground, such as ranch houses. A variant, called pyramidal hipped roof, does not have a summit; It joins the triangular slope at a single point at the top. The pyramidal variant, whose design is visually pleasing, works well in small houses and bungalows or cottages.

Types

Two types of pitched roofs have been popular in the past. The mansard roof, often built in the late nineteenth century, consists of two sections separated in the hipped roof. The extra section provides space for the owner to add another floor. Another type of gable roof that, unlike the mansard roof, has a flat section at the base of the roof was built in some homes in the Mississippi Valley in the nineteenth century. The roof design helped create wrap around porches.

chimney-5

Special mortars for repairing chimneys

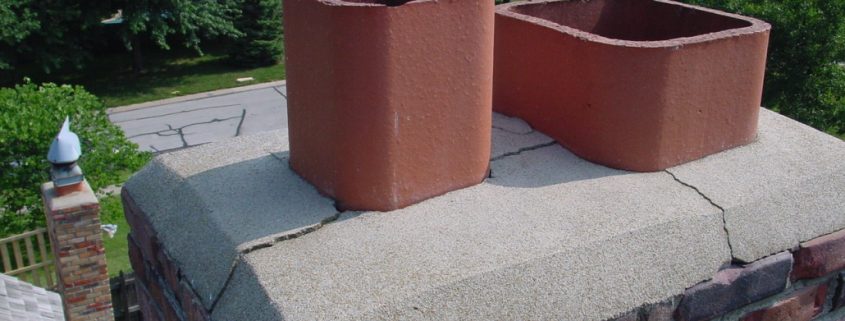
Chimneys are often an appreciated feature, so it’s not surprising that damaged or deteriorated mortar or bricks receive prompt attention and need careful repair. Use a special type of mortar for repairs in the combustion chamber, elsewhere you can use standard mortar, but for your repairs to be better, use additives.

Refractory mortar

For the repair of the combustion chamber, the inner chamber where the fire burns, use a special type of mortar resistant to extreme heat and temperature cycling. Known as refractory mortar, this mortar uses binders such as calcium aluminate or sodium silicate that tolerates high temperatures, rather than Portland cement. The refractory mortar is available as hydraulically placement and air drying, or premixed,. The hydraulic setting refractory mortar is resistant to acids and soluble in water once cured, so it is suitable for indoor and outdoor applications. The premixed refractory mortar which dries quickly and is water soluble, can be washed with it, so it is easy to clean, but is only suitable for indoor use.

Standard mortars

Standard mortars were made using Portland cement, hydrated lime and sand combined with water to obtain the right consistency. Depending on the nature of the repair, the standard mortar may be adequate or be modified by adding a small amount of additives to improve certain properties. N mortar is the best general-purpose mortar and is recommended for most projects. Type O mortar, also known as mortar indication, has features that make it better suited for non-structural repair generally in higher grade situations.  K mortar, which is used for historic preservation and when load resistance is not important, has a porous nature that helps prolong the integrity of the oldest blocks.

Additives

A number of ingredients can be added to mortar to create special mortars for certain circumstances. Many repair mortars are created using an additive polymer such as polyvinyl acetate, dichloride and acrylic or modified acrylic adhesives or act as water-reducing agents, increasing its strength and permeability limit. The accelerators can be added to the mortar to shorten setting time, a useful quality especially in cold weather. Retardants are added to extend the working time of the mortar and slow the hydration of cement during hot weather. Color pigments are also commonly added to repair mortars to allow replacement to match the existing mortar.

Making repairs in the mortar

To repair mortar, you may have to clean the inside of the home to identify any defective seals. Use a chimney cleaner as needed. Remove mortar or damaged bricks with mortar rake, a chisel, a hammer and a stiff brush. Moisten the surface of the bricks to join the mortar. Prepare mortar and mortar in the joints applying layers of 1/4 inch (0.6 cm), allowing to cure for about 30 minutes between each coat. Once the brick surface is achieved, with the appropriate beam tool, match the existing cement mortar. Clean the face of the bricks with a stiff brush or a damp sponge.